Blog
Sealing a Traditional Wood Palette

Wood palette, ready to use
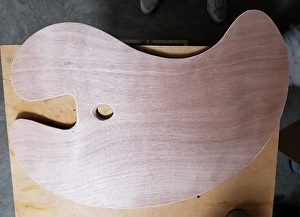
A traditional wooden palette takes a little preparation but it's worth the effort. This is a large Richeson palette that you can get online for around $25 (dimensions are 18"x26.5). The palette is not balanced and I highly recommend having a balanced palette as well as shaping the thumb hole for comfort. It's a good idea to do those things before sealing so check out my upcoming blog that describes how I improved mine if you're interested.
The process of sealing the palette is easy to do during breaks from other work. You'll need: boiled linseed oil from the hardware store, nitrile gloves and high quality paper towels or lint free rags (If paper towel leaves bits don't use it).
If you want to start off with a toned palette you'll need Ultramarine Blue, Burnt Sienna, Yellow Ochre and a white (artist oil paint) and a palette knife (you can use a black instead of Ultramarine). I have used polyurethane to seal palettes but the old way of repeated applications of linseed oil yields a wonderful surface that improves with use. Each painting you do becomes a part of the palette's patina.


Pour several ounces of oil on the backside of the palette and spread it evenly. Cover the whole back generously. I use a glove and spread it with my hand because rags or paper towels soak up and waste a lot of the oil.

Let the oil sit on the palette for an hour or so and then wipe all excess oil off with a rag or paper towel. Never let an oil film of any appreciable thickness dry on the surface.
If you just want to seal your palette without a toning it, repeat these steps on the front side. It will take five or six applications, back and front, before the wood has absorbed enough oil to function as a palette. If you like to paint on a warm tone, this is a fine option.
If you want a neutral gray patina from the start, as I prefer, save unused paint from normal painting sessions, or just use Ultramarine Blue, Burnt Sienna, Yellow Ochre (or blue and other earth reds and yellows) and white to mix a mid-tone neutral gray.
Add enough oil to make an easily spreadable paint (softened butter consistency) and cover the front side of the palette. Let it sit for an hour.


Wipe off the excess, rubbing the tone in a circular motion, with a lint free rag or high quality paper towel. If it's too tacky to rub in easily, add some oil. The goal is to have oil (and pigment) actually absorb into the wood rather than sit on top of the wood like a coat of paint. The wood should appear stained as in the image below.


If a paint film is left to dry it will result in a gummy area that will impede mixing. Let this patina dry for a few days. If you want a more opaque patina, repeat. Then follow instructions for sealing as you would the raw wood (wipe on oil with or without gray added, let sit an hour, wipe off excess and repeat daily, back and front). If the new oil starts to remove the patina tone, wait longer to oil it. When the palette can reflect a hazy image, like the window reflected below, it's done.

To care for it after use, scrape the majority of the paint off with a palette knife. The paint that can't be removed with a palette knife can be scraped and mixed together, adding a little boiled linseed oil to release it from the wood grain and to make it mixable. Add a little of whatever earth color, blue or white is needed to make this slurry a neutral gray. Then, adding a little more boiled linseed oil if required, wipe off the slurry and rub to a polished finish. This will allow additional patina to absorb and build up slowly over time without building up an actual layer of gray paint.
If you'd like a free pdf copy of this post click here.
Have fun!
I'll be adding a post on balancing your palette and making it comfortable to use soon. The best way to keep up with this blog is to go to the very bottom left of this page (keep scrolling), find the Facebook logo and if you're on Facebook, both 'like' and 'follow' or sign up for my newsletter.

Leave a Comment